So, as you can probably guess, I love Saisons. The typical story told about the style is that it emerged from farmhouse brewing traditions in France where they needed a beer for their seasonal farm workers to keep hydrated while working. If you know anything about saison today you’ll know that it’s not exactly something that you’d want to drink a lot of and then go try to wield a scythe and get some work done. So it’s likely that the first saisons were much lower strength beers than what is typically available today. The BJCP has mentioned “Table Saison” as a variant of their 2015 definition for the style that ranges 3.5%-5% I actually wanted to make something that was even lower alcohol than that (if possible, I have this curse about trying to make session beers and they end up being 6-7% somehow). My goal was to make a beer that was around 2.5% abv, but hopefully didn’t taste too watered down.
Farm Hand’s Ale (15 gallon batch, 30 minute boil)
10lbs Northwest Pale Ale Malt
2lbs Flaked Oats
1.5lbs Aromatic Malt
1.5lbs Munich Malt
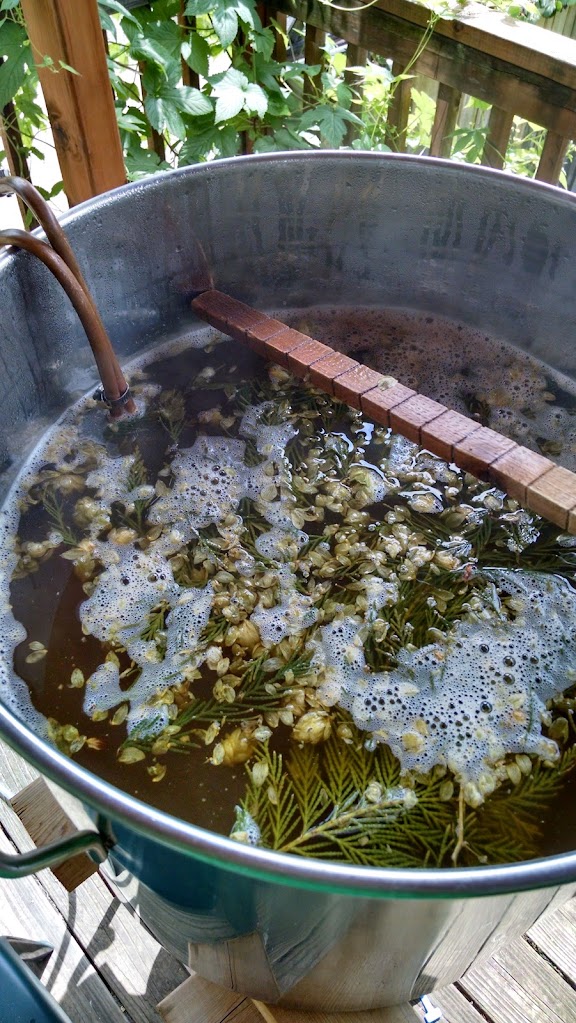
2.5oz Glacier Hops 3.2%AA FWH @30 minutes
2oz Glacier Hops 3.2%AA @2 minutes
I decided to go with the high % (though maybe not a terribly high amount) of aromatic malt for this to help give it a good malty flavor despite the small amount of malt being used. I included the oats to boost the mouthfeel of what is likely to be a rather thin beer otherwise. I used glacier hops because glacier hops are the best, and did a 30 minute boil because I like to shorten my brew day.
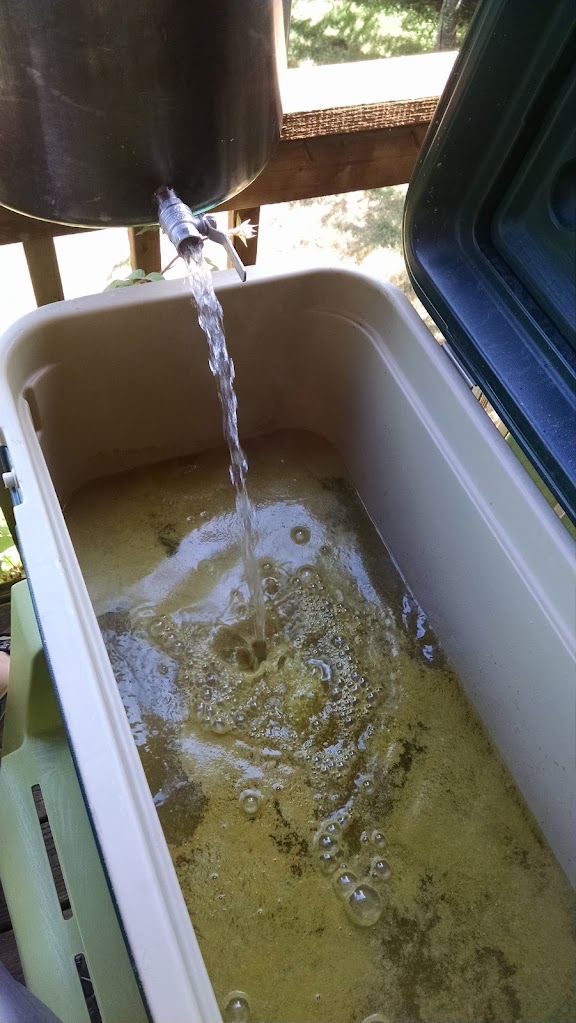
I mashed this beer rather thin since my HLT is my old 10 gallon boil kettle and I wanted to get 15 gallons of runnings so I mashed in with 9 gallons of water to achieve a mash temp of 155F and then sparged with another 9 gallons of water after about an hour. It took a while to get to a boil and my 19 gallon kettle was pretty much maxed out, I actually saved a few gallons off and added them to the kettle as I went to chill. Otherwise the boil went fine with no major hiccups.
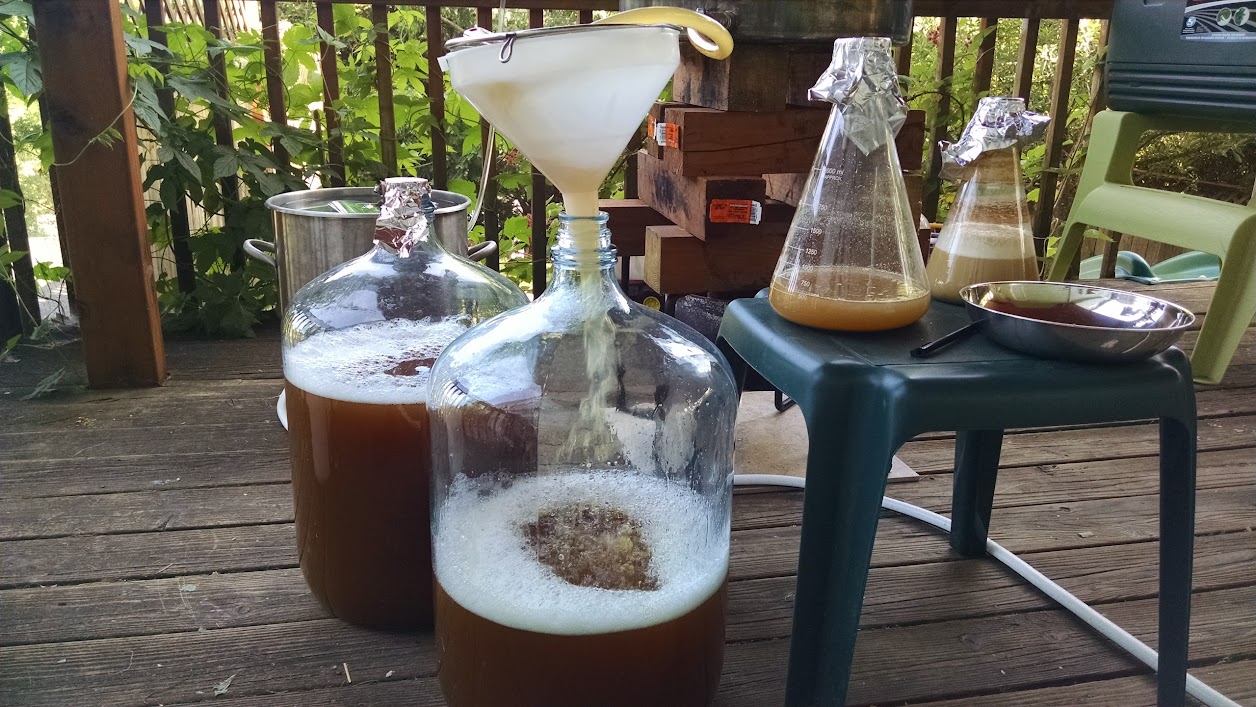
I split the wort among 4 fermentors, 2 2.5 gallon and 2 5 gallon batches were all pitched with different yeasts. The 2.5 gallon batches got my wasp yeast for it’s inaugural batch and the other 2.5 gallon got some of my local yeast, that was harvested from a plum blossom. I think I need to just come up with a name for all of the local yeast captures, since they are all pretty much the same yeast. The 5 gallon batches got my hefe/brett (probably needs a better name) culture and my abbey culture that had been revived from a jar of yeast that has been in my fridge now for 3 years and 4 months, ha!
The original gravity came out to 1.031, which is 6 points higher than I was shooting for meaning my efficiency was 88.5% which seems incredibly high to me, I wonder if the thinner mash had something to do with that? So I guess this could possibly qualify at the low end a Table Saison depending on attenuation. All of the batches took off fermenting pretty quickly. I will post tasting notes when they are ready.
On March 5th I gave a presentation at the PNWHC about how to catch wild yeast. It went pretty well and I got a friend from my homebrew club to film it for me. So now it’s up on youtube for your viewing pleasure:
I’m also going to write out some words here describing what I talked about in the video for you people who hate watching videos like I do.
What is Wild Yeast
A lot of beers are marketed as wild if they contain brett, brett itself is often called a wild yeast, and WPL644 trois was thought to be brett but is apparently sacc and is being called a ‘wild’ saccharomyces. But if you buy a pure strain of brett from a lab, is it really wild? You know what you’re buying, you know basically how it will behave and what it will do to your beer. Maybe that yeast strain was wild once but I don’t really think that’s wild anymore.
My definition: Wild yeast is yeast that came from the wild
Sources of Wild Yeast
My favorite source of wild yeast is from fruit. As we all know yeast likes sugar and fruit generally is sugary so fruit would be a logical place to expect to find yeast in larger proportions. Some fruits I’ve gotten yeast off of: dates, juniper berries, cherries, grapes, apples. Other good options to try: raspberries, blackberries, blueberries, plums. Farm pressed unpasteurized apple juice is another good source, just get the juice, stick an airlock on it and let it ferment.
If you’re trying to capture a sort of terroir for a specific area then I recommend using fruits harvested from that area, either grown yourself or wild foraged. You can also get yeast off of store bought fruit, just try to get organic if you can and do not use irradiated fruit as that won’t work.
Veggies are another good source, though you’re more likely to find bacteria on vegetables. Think about sauerkraut, you chop up a cabbage, mix in some salt and it ferments itself; plenty of lacto there. Ginger root and it’s cousins (turmeric, galangal) seem to have a plethora of useful microbes hanging out on them including sacc, brett, lacto, even some useful molds.
Flowers are another option for wild yeast, especially if it’s spring and there’s not any local fruit in season to harvest from. I recommend using edible flowers, like apple/plum/cherry/peach blossoms, roses are also edible.
Raw/unpasteurized honey is another good source of wild yeast. Isn’t honey anti-microbial? It kind of is, but the main reason it never goes bad is that same reason that a sack of sugar in your cupboard never goes bad, the high concentration of sugar is the main thing that protects it. the sugar sucks the moisture out of any microbes that happen to be in there, causing them to go dormant or die. But the ones that don’t die are dormant just waiting for the conditions to become favorable, ie the sugar gets watered down.
Insects are another source of wild yeast. I recently read about how Saccharomyces overwinters in the stomach of queen wasps, a few hours later I just happened to find one taking a nap on my smoker, I also had to make starters for a brew that evening so I took it as a sign from God. She went into a starter as well, fermented quite vigorously too. I haven’t used her in a beer yet.
Open air inoculation is probably a method you’ve heard of for producing wild yeast beers. Lambic and other belgian sour beer producers utilize this method most famously and some american breweries have also begun replicating this process. I haven’t done a ton of open air inoculations, from what I’ve read of other people doing it, it’s a good way to catch mold, though I have been successful the one time I’ve tried it.
How to capture
So you’ve got your source, how do you get the yeast that may be on it into a beer? Essentially it boils down to: make a starter, add your source. However there’s a few things to do a bit differently for this starter:
if you’re just trying to capture yeast and not bacteria (yeast in this case includes sacc and brett) you should make a hopped starter, just toss a small amount of pellets in your starter before you boil it, you don’t have to target a specific IBU level hops will inhibit lacto even when dry hopped. Make sure your starter is high enough gravity (~1.030) to end up being above 2% abv when fully fermented out, this will kill enteric bacteria. I also add some nutrient to the starters to give the yeast some extra food. Shake up or otherwise oxygenate the starter before adding your source.
Add the source. If you’re inoculating from open air, I’d pour the starter into a sanitized shallow bowl, cover with cheesecloth to keep bugs out (or don’t) and let it sit out for at least 3-4 hours and not longer than 24 hours, shorter is probably better to minimize oxygen exposure and reduce the chances of catching mold. Then add it back to your starter flask. Put an airlock on the starter and don’t stir or otherwise try to aerate this starter at this point. This is to deter mold and acetic bacteria.
Wait patiently. I’ve had to wait upwards of a week before I noticed any visible activity/fermentation in some starters.
If you want to catch both yeast and bacteria then there are a few things to do differently. Mainly, don’t hop the starter. Add your source and cap the starter with foil and feel free to aerate. Try to keep the starter cool, in the low 60sF if you can, this helps the yeast to have a chance to grow alongside the faster growing bacteria which prefer warmer temps. Again, wait patiently.
Safety Considerations
Some nasty things can potentially grow in this first starter that can make you ill. You’ve probably heard that no human pathogens can grow in beer and this is generally true, but they can grow in wort. The reason why this isn’t an issue for homebrewers is that they are typically pitching a vast amount of yeast into their wort and nothing else is going to have a chance. With this first starter, we’re not pitching a vast amount of yeast, we’re pitching a tiny amount of yeast, and also a tiny amount of other microbes that we may not want.
Here are some things to do to lower the risk of those things taking hold.
Pre-lower the pH of the starter wort to 4.5 or less to inhibit E. coli and C. botulinum. Typical wort pH is 5.0 so you don’t have too far to go to get to 4.5. You can also fortify the wort to 4+% abv by adding a neutral spirit such as vodka, this will inhibit E. coli and outright kill enteric bacteria. You can also keep the starter for a month at room temp (not in the fridge) which will let E. coli really die off. You can read more about safety precautions here. I haven’t done any of these things (partly because I wasn’t aware of them until recently) and I haven’t gotten sick, maybe I’m just lucky? Regardless, if you do happen to be immune compromised then I recommend that you stick with lab yeast.
Did you catch anything good?
So now you’ve got your source in your starter, how do you know if you caught anything good? Well first off, did it ferment? Like I said earlier, be patient, you may have to wait some time to see any signs of fermentation and it’s also possible (but unlikely in my experience) that it may not ever ferment. If it doesn’t ferment then, obviously you didn’t catch anything you’d likely want to put into a beer. If it does ferment, let it ferment out completely.
Did it grow mold? If so you should toss it and start over. Yes there are some molds that aren’t harmful, but I don’t know how to distinguish them from the bad ones so better/safer to just start over.
If it fermented, how does it smell? If it smells awful, like poo or vomit or feet, you probably don’t want that in your beer so chuck it and start over. If it smells good, that’s a good sign that you got something good. If it smells good and didn’t grow mold crash it in the fridge, decant the pseudo beer from the top of the yeast and give that a (small at first) taste. It’s not going to taste exactly like beer but it’ll give you an idea. If it tastes good then you probably got something good.
You probably noticed I said toss it and start over a number of times above, while my success rate for catching wild yeast is above 50% there are many roads to failure at this step so you may want to make up multiple starters at one time to increase your chances of success.
Step it up
Now that you’ve caught something good it’s time to step it up to eventually pitch into a large batch. You can do a starter now how you normally would, though if you’re going for just yeast it won’t hurt to continue using a few hop pellets in your starters. Feel free to aerate your starter like your normally would at this point.
Make beer!
For newly caught yeasts I typically have a standard saison recipe that I like to pitch it into, but you can let your culture choose the style of beer you brew, if it seems very fruity, maybe a british or american style would be more appropriate. Spicy/bretty would lend itself to a saison or farmhouse beer. bubblegum and clove flavors could do well in a wit or abbey style beer. Did you go for bacteria and get some sourness? Brew a Berliner Weisse or Gose. Whatever you choose to brew for this initial large batch of beer, I’d steer away from overly hoppy or malty styles just so that you can really get a good understanding of the sort of flavors your yeast produces.
Keep in mind that your wild yeast may take longer to ferment a beer. I typically give my beers at least two weeks in primary sometimes as long as a month depending how busy/lazy I am. For the first trial of a new yeast, when it seems to be done fermenting ie the beer has reached expected FG (or lower) and doesn’t seem to be dropping any further, I like to rack a gallon into a separate jug, put it under airlock and stash that away for 6+ months just to see if the yeast does anything further with the beer. Sometimes after tasting that aged beer I’ve wished that I had left the entire batch to age. The rest of the beer I’ll keg, I recommend against bottling, especially for this first batch just because you don’t know if they yeast will slowly continue to produce CO2 and result in bottle bombs. If you are unable to keg then you could bottle and store the bottles in the fridge after they have primed, but I still caution against that as I’ve had some jars of slurry carbonate in the fridge. Cold temps aren’t a guarantee of stopping some wild yeasts, they can be very hardy.
Save the slurry
After racking the beer off the trub, I just dump it all into a jar and stick it in the fridge. Put a label on the jar or you will forget what it is. I have 2 mystery jars in my fridge right now. When I want to make a beer with that yeast again, I’ll make up a starter and just take a scoop of the trub from the jar and grow it up in the starter. In this way I always have a sort of baseline from which to draw, every beer with that yeast is ‘second’ generation. How long can you store it? I’ve had one jar in the fridge for three years and still got viable yeast out of it, though it took a lot longer for the starter to get going. Maybe it’s just that particular yeast, but like I said wild yeast is typically hardier than their coddled lab cousins.
Where to go from here?
Well obviously, make amazing beer. If you want to get more scientific you can learn about making plates for isolating specific yeast strains from your culture and making slants for better long term storage. I haven’t done either of these things yet. As we know with homebrewing, the rabbit hole goes ever deeper and you can go as deep as you want.
More resources
Here are some more great resources for info about wild yeast beer, sour and funky and other crazy beer experiments.
You’re probably already familiar with The Mad Fermentationist. If not it’s a great blog about wild and mixed microbe beer making (among other things). he has also written a book called American Sour Beers that I can’t recommend highly enough.
There is a facebook group called Milk the Funk that is just amazing. It’s full of tons of smart people who are happy to share their knowledge and are doing a ton or really interesting things with beer. Joining that group has vastly improved my facebook feed. Milk the Funk also has a website with a great wiki full of tons of great info.
The Yeast book by Chris White and Jamil Zainasheff is also a great resource though it can get pretty technical at times. It is packed full of great info about yeast in general.
Another great resource is Wild Brews by Jeff Sparrow, this book deals more with the production of Lambic and sour Flemish ales. There’s a ton of great info about a lot of the microbes we’re looking to catch though: Saccharomyces, Brettanomyces, Lactobacillus, and Pediococcus.
I hope this info is helpful to you. If you have any questions hit me up on twitter. Go catch some yeast!
—-
Update: A Spanish homebrewing blogger requested to translate this post into spanish for his readers: here’s the post!
Update: A French homebrew blogger has translated this post into French.
A member of my homebrew club brought a ton of hops to our Christmas party in January to give out and I went home with three good sized bags of hops. Two of which were Chinook, which I really dislike when used for bittering. I mentioned on twitter that I wasn’t sure what to do with all of these chinook hops, and another member of the club, Tyler, tweeted back that he was in the same boat.
I suggested we try them as dry hops:
An interesting idea that’s been floating around in the craft brewing and homebrewing arenas recently is getting yourself some generic american light lagers, opening the bottles and dry hopping them with a few pellets of hops. You use a variety of hops (though only one variety per bottle) let them steep at room temp for a few days, then chill, decant and taste. It’s a way to give yourself an idea of how that hop variety would taste when used as a dry hop without much in the background beer to muddy the waters (so to speak). I believe this idea originated with Anchor Brewing.
This idea resonated with tyler, and he suggested we do so with a large variety of hops and bring the resulting beers to the next club meeting since the theme was hoppy beers. He got some additional hop varieties donated from our LHBS, I had some additional pellets in bulk in my fridge, in all we ended up with 11 different hop varieties dry hopped in Coors Light since we couldn’t bring ourselves to buy Bud (lesser evil I guess? we were gonna get Miller Lite but couldn’t find it in bottles).
Anyway, after that long introduction here are my notes on the hops we sampled:
Hallertauer Hersbrucker – quite lemony, herbal
East Kent Goldings – mild herbal
Amarillo – fruity and delicious
Willamette – cheesy (these were also gifted at the club party and had apparently not been stored well, I doubt this is representative of the variety)
Horizon – herbal, slight lemon
Cascade – fruit, citrus
HBC 438 – slight peach and licorice? this one was kind of odd
Glacier – herbal
Mosaic – overwhelming cat piss, lemon, fruit
Falconer’s Flight – really lemony
Chinook – herbal, flowery; could be good dry hopped in a saison
A few things that stuck out to me:
I was surprised at the lemonyness of the Hallertauer Hersbrucker. That wasn’t something I would expect from a noble hop.
I didn’t hate EKG or Chinook as dry hops. I generally dislike both of these hops when used in the boil. I’m actually looking forward to using the Chinook as a dry hop in some saison down the line.
I thought Mosaic was disgusting, it was super cat pee. I’ve gotten this before from beers featuring Mosaic, but generally not as a dry hop. I used to think it was a 30 minute addition that brought out the cat pee for Mosaic, but now I’m wondering if there’s something else at work here (harvest time, hop yard, vintage?).
The Willamette were cheesy, I guess they hadn’t been stored well, but it’s still not a loss, I’m going to put them into a paper bag and let them sit out and fully oxidize, the cheesiness well go away and they’ll eventually be good hops for use in sour beers.
All in all it was a cool experiment and an easy one to do to try out a whole bunch of hop varieties. Just don’t be too upset about drinking some hop particles as they don’t always like to stay at the bottom of the bottles.
Appearance: Fairly clear light straw color with minimal head that dissipates quickly into a thin surface lacing. Vastly different from the other raw beers.
Aroma: Slightly hoppy with a rustic barnyard note: earthy, herbal.
Taste: Grainy, herbal, a touch of citrus/lemon, funk throughout. I love it. The taste is everything I want out of a farmhouse ale.
Mouthfeel: Fairly thin but not watery; hard to explain.
Overall impression: This is a great beer; like I said above, it’s everything I want a farmhouse ale to be. I’m really pleased with this, especially since I was initially considering dumping it. This was the other half of the batch with the cypress/lemon balm wort, fermented with a wild sacc/brett mix for four months. It had this sort of unpleasant dirt flavor going on that I really disliked, I think from the lemon balm? I figured I should try dry hopping it so I filled a bottle from the fermenter, dropped a couple of horizon pellets in and a carb tab, after a week it was pretty good. I tried it again with some glacier pellets and it was also good so I kegged it with both and I was blown away! The dirt flavor is gone and replaced by this pleasant citrus note. Additionally the hops just seem to accentuate the funk from the brett. I need to dry hop with these hops more, they really are my favorite varietals.
Another thing rather striking is the clarity of the beer. Considering the other raw ales were quite hazy this one is downright transparent. I don’t know if that’s from the time or the brett or both.
Appearance: The beer is a pale amberish to slightly red in color, with a respectable amount of head upon pouring that condenses into a mat of foam capping the beverage.
Aroma: A hint of roast (I assume from the victory malt) and subtle esters.
Taste: Malt and mild roast with maybe a bit of hoppy astringency. I think I don’t like the Sonnet Hops that I tried out for this beer. There are some subtle esters below the surface but nothing that really stands out.
Mouthfeel: Thin with high carbonation on the tongue. I may have bottled this too early.
Overall Impression: I don’t really like this beer all that much. Not that it isn’t a good beer, it is. There aren’t any off flavors that I can detect, I think it’s just the matter of I don’t like the Sonnet Hops. That said, I prefer the control I fermented with the same yeast (the one that came from my neighbor’s honey) that hadn’t been dried on a stick. The control seems to have more fruity esters and bubblegum flavor that I really like about this yeast. Now that I think about it, the kveikstokk yeast is a bit more similar to other wild yeasts I’ve captured from around the area here.
Maybe you’ve heard of a Magic Stick? No? Kveikstokk literally translates from Norwegian to ‘yeast log’ in English. It’s basically a stick of wood that is used to store yeast between brews. Supposedly the origin story is that long before people understood what yeast was they noticed that brews tasted better if they stirred them with a certain stick. The theory being that good yeast from a previous brew stuck to the stick and transferred to the next brew via the stick.
I was inspired to give this method a try when I read about kveikstokker on Lars’ Blog. I have collected apple and birch branches from pruning trees on my property for use in the smoker so I decided I’d try to make a couple of kveikstokker from those branches. I used a rasp to take off the outer and most of the under bark, and then used a hand saw and a file to put some notches and grooves into them to give the yeasties somewhere to stick to and hide.
Once I had the sticks ready there was the matter of yeasting them up. I figured the best way to do this would be to toss them into fermenting beer so I brewed up some Belgian Pale Ale, split it into two batch and pitched my abbey strain in one and another locally harvested strain in the other. In a show of spectacular poor planning I found out at this point that the kveikstokk I had made from the apple wood was too fat to fit through the carboy neck, so only the birch kveikstokk made it into a beer to get yeasted up. It happened to be the beer with my abbey yeast.
After three weeks or so, the beer was done fermenting and in another display of poor planning I could not now remove the swollen with beer (and yeast) kveikstokk from the carboy. I racked the beer out of the carboy and for a while I was concerned that I was going to have to figure out some way of drying out the stick inside the carboy. Fortunately with much tugging, cursing and wiggling I was able to extract it and hang it up to dry. Once it was dry I put it into a plastic container to keep it safe from day to day banging around the workshop until I brewed again. Lucky for me, I happen to own a gallon jug with an extra wide neck so my issues with carboy necks weren’t an issue when using the kveikstokk to ferment a beer.
Eventually I brewed up another Belgian pale ale and I was able to use it. I placed the kveikstokk into the sanitized jug and filled it to the shoulders with wort affixed an airlock and placed it inside the fermentation fridge along with the main batches of the beer.
After two days there was still no action on the kveikstokker beer and I was wondering if it was going to work. My worries proved unfounded as on the third day krausen formed and it looked to be fermenting just fine. Hooray! It worked! After three or so weeks it appeared to be done fermenting, as did the larger batches with normal pitches of yeast. I bottled the beer and hung the kveikstokk up to dry again. After the beer had been bottled for a bit more than two weeks I chilled a bottle down and poured myself a glass. It was decent, but not as good as the large batch of beer that I used a normal pitch of the abbey yeast on. I’ll do some honest to goodness tasting notes on both of the beers in a few days.
This was a fun experiment and I think I’d like to give it a try with some of my other wild yeasts; probably one of my cultures that (I believe) contains brett. Brett is supposed to be able to break down uber complex wood sugars so it seems like living on a stick wouldn’t be a difficult feat for such a beast. So that may be in the future. Maybe I’ll whittle the applewood down so it’ll fit into a carboy neck and toss it into a brett ferment. Other than that, I’m not sure if the kveikstokker is a great idea for a direct pitch. I do also want to try using it to inoculate a starter, build the starter up and then pitch that in tandem with the same yeast from my typical starter/pitch procedure. It could be that this is some sort of strange way of storing yeast (maybe as a backup) for the long term?
Appearance: The beer is a pale amber and slightly hazy with a large pillowy head of foam that dissipates very slowly and never fully goes away. Quite a bit of lacing here as well.
Aroma: Grainy with a touch of an earthy herbal aroma and some fruitiness with a hint of lemon that comes out more as the beer warms up.
Taste: This is a malty beer with a fruitiness from the yeast and the herbs involved, it actually harmonizes quite well, nothing dominates. It’s not bitter but there is some hiding in the background, due to the beer’s dryness it, again, balances very well.
Mouthfeel: There is good body, it’s not thick like the spruce ale, but a nice body that sticks in your mouth for a bit after swallowing.
Overall Impression: This beer is very good, it’s extremely well balanced (toward the malty side). Considering that it’s a ‘herbal’ (not sure if cypress counts as a herb?) beer it’s not punching you in the face with either the cypress or the lemon balm and if you weren’t told they were in there you may have difficulty picking them out.
Appearance: The beer pours a hazy light amber with a ton of foamy white head. As the foam collapses it forms a dense foamy cap that does not dissipate, or at least it hung around until I finally drank it down with the final gulp. Lacing is abundant.
Aroma: Wheaty with a slight maltiness, but the dominant aroma is of the spruce tips, a hint of pine but mostly a sort of cool fruity citrus? I know that doesn’t make any sense, deal with it.
Taste: Spruce up front, not piney but more fruity with a hint of ascorbic acid that grudgingly gives way to malt/wheat on the finish with a very slight fusel alcohol burn probably from the hot ferment.
Mouthfeel: Very full bodied despite the FG of 1.003, probably due to the extra protein.
Overall impression: This is a good beer, but not great. I’m not sure if that’s particularly due to the fact that it is raw, I think it’s more due to fermenting it too hot than anything else. I also think it could use a little more hop presence which can probably be achieved with additional mash hops and/or some hops in the first wort/whirlpool.
I’ve read that raw ales do not last more than four to six weeks (though I’m not sure when you should start counting). It’s been nearly a month since brewing this beer and it’s only improved thus far. I’ll be sure to update this post if it declines (or if it doesn’t).
A few weeks ago I brewed up a bunch of raw beer. Go read about it if you haven’t already. I brewed two different beers of 12 gallons each and split them into two different fermentors per batch. As of now three of those batches have been bottled/kegged and one, fermenting with a wild sacc and brett blend, remains in primary. I’m not totally sure how to approach this so I’m just going type out a bunch of words and see how that goes.
Everything fermented at 75F because I wanted to see what my wild yeasts would do at that temp. Conclusion: I think they’re better fermenting a bit cooler but still made good beer.
Sub note: the two spruce beers were fermented with locally harvest strains that were harvested at different times and from different sources (wild grapes last fall, and a plum blossom this spring) but the beers tasted identical, which helps point to this yeast being the dominant strain in the area. Conclusion: build a coolship.
After one week all of the beers were very well attenuated with gravities around 1.003 for each batch. Conclusion: I need to mash hotter or use crystal malt or both.
After one week these beers were not ready to drink, in fact I was really concerned about them as they had what I can only describe as a peanut butter flavor to them, the cypress and lemon balm beer being more peanut buttery and the spruce beer being less so. Thankfully this lessened with time (yeast probably cleaned up some) and is completely gone when the beer is cold. I’m wondering if the extra protein in the beer is a contributing factor here? Possibly the non-hop herbs are also a contributing factor. As a counter point my wife did not get any peanut butter flavor from the sample. Conclusion: next time just use hops.
All of the beers are very malty, which is not a big shock
The spruce beers weren’t very sprucey tasting, in retrospect, this should have been obvious before I even brewed it, historical spruce beers were often brewed with spruce essence which was basically just a super strong boiled down (for hours) spruce tea. I added some spruce tips in the keg to add some sprucey flavor to one of the beers. Conclusion: next time add spruce to the strike/sparge or make a spruce essence.
For the other non-sprucey spruce beer I juiced 5 pounds of wild harvested blackberries and picked an ounce or so of sage from my yard, added those to the keg and then racked the beer on top to fill it up and put it in the kegerator a few days ago.This has the potential to be very good, though it seems the acid from the juice has caused a lot of the protein in the beer to coagulate and the first few pours have had a lot of curds…
The cypress lemon balm beer has a very slight hint of a sort of dirt? flavor that’s followed by a touch of lemon and herbal flavor, though this dirt flavor seems to be going away. I wasn’t expecting any lemon from the lemon balm having brewed with it before and not gotten any. I added some additional cypress in the keg to boost the cypress flavor. Conclusion: lemon balm is a poor brewing herb, stop putting it in beer.
None of the beers have any hint of DMS, half of the malt in the lemon balm and cypress beer was pilsner and still nothing. This is the main argument (that I’ve seen) against raw beer and it is not an issue.
None of the beers were infected. Or if they were the infection hasn’t manifested itself after three weeks.
The beers were not hoppy at all, this was expected, but they are really not hoppy, at all. The spruce beer was supposed to be ~15 IBUs which I know is not a lot but it seems like it may be even less? Or perhaps the extra protein in the beer is also a contributing factor here? I’d like to pick up some Polaris (~20% AA) hops and see how a raw ale with those hops comes out.
I don’t think this is going to completely replace boiled beer for me, but I will definitely keep it in my repertoire as a viable option for making good beer.
Supposedly raw ale does not have as long of a shelf life as boiled beer, this remains to be seen as it’s only been three weeks since they were brewed. I plan on letting the batch with brett go for a couple months in primary so I guess we’ll see how that turns out too.
If you care about clear beer, this is probably not the technique for you.
This past weekend I was able to try a brewing technique that I’ve been wanting to do for a few months now: Brew a no-boil beer, AKA Raw Ale. most brewers have been taught that you have to boil beer, that’s just the way it is and it’s not something to be questioned. Kind of like how beer always has to have hops and barley. None of these is necessarily true, and most of these requirements stem from laws governing commercial production of beer some of them dating back hundreds of years. The truth is, before the advent of large metal pots for boiling in and cheap abundant fuel sources, it was more likely that most beer was not boiled, just heated enough to hasten the conversion of starches to sugars. I’ll admit right off that the historical aspect of this is appealing to me, but more appealing is the amount of time and fuel I can save by brewing this way; practicality FTW.
But wait, you say, isn’t boiling necessary for various practical purposes, like sanitization and hop isomerization? The answer is not exactly. The three main reasons to boil your beer generally taught is to pasteurize your wort to prevent unwanted infection, to boil off DMS which will otherwise make your beer taste like canned corn, and to isomerize and dissolve alpha acids from hops into the wort to lend bitterness to your beer. There are some other things that also happen in the boil but these three are often touted as the main reasons why you have to boil your wort. Let’s talk about them.
Boiling pasteurizes your wort. Actually pasteurization can happen at much cooler temps than boiling. It will happen in 30 minutes at 150F and in like 3 seconds at 160F. So your standard hour long mash should be effective pasteurization for your wort.
Boiling drives off DMS. This is true, the thing we’re missing is that DMS doesn’t form until the wort reaches 175-180F so if you don’t go above this you don’t get DMS.
Boiling isomerizes and dissolves alpha acids from hops. This is true and is the biggest drawback to brewing raw ale. However you can get some isomerization and IBUs by putting hops in your mash. By using high alpha varieties (I like Horizon) and in large quantities you can achieve an IBU level that is fine for a number of styles; styles I happen to enjoy. You’d probably have trouble getting to IBU levels required for a double IPA with this method, but for belgian/farmhouse styles 10-15 IBU is ok. I’ve also thought about adding hops in your strike and sparge water, I’ve read that you need some sugar in solution to get isomerization but have never actually seen any science backing this assertion up.
So having rationalized away most of these requirements, I felt confident to give raw ale a try. Due to it being Father’s Day weekend and me having an awesome wife, I was able to brew on Saturday and Sunday. This did indeed shave a couple hours off of my brew day so I was happy about that (and so was Anne). I brewed a spruce beer on Saturday and a lemon balm and cypress beer on sunday. I used slightly different techniques for each to see sort of what that would do for the beers.
Spruce beer
hopped strike water in the mash
For this beer I used the following recipe:
14 lbs Northwest pale malt
6 lbs Munich 20L
4 lbs Flaked wheat
4 oz Horizon hops (11.5% AA) in the mash for 70 minutes (60 minutes saccharification + 10 minutes mashout)
4 oz Spruce tips in the mash for 70 minutes (60 minutes saccharification + 10 minutes mashout)
4 oz Spruce tips in the mash for 40 minutes (30 minutes saccharification + 10 minutes mashout)
4 oz Spruce tips in the mash for 20 minutes (10 minutes saccharification + 10 minutes mashout)
I mash in a cooler and I add water that’s well above my strike temp to the room temp cooler, then let the water cool to my strike temp before doughing in. Right before I added the water I though, i should add some hops now, so I dumped in about half of the 4 oz right before I added the 180F water to the mash cooler. It took about 12 minutes to cool to my strike temp of 166F when I added the grain the rest of the hops and the first charge of spruce tips. After 30 minutes I added the second charge and sorta kinda stirred them into the mash and the same again 20 minutes later. After the full 60 minute mash the temp was down to about 150F which is more than I typically lose. I’m going to blame opening the mash up twice and adding cold/frozen spruce tips to it; still an acceptable loss. I vorlaufed about 3 gallons until it was running quite clear and drained the mash. My first running gravity was 19° Brix (1.077) according to my refractometer. I added 7.5 gallons of sparge water at 180F and achieved a mashout temp of 168F that I let sit for 10 minutes and then vorlaufed and drained again. Second running gravity was 8.4° Brix (1.034).
After draining the sparge, I began chilling the wort for pitching yeast, hey, it’s a no boil! Chilling didn’t seem to be much shorter than when I boil which does make sense. Once I got it down to 80F I drained into two carboys and pitched yeast. For this beer I’m trying out a new local yeast I harvested in some final runnings from my last brew day in the spring that I left sitting open to the air while I cleaned and put everything away then I added a plum blossom from my tree and it was fermenting by the next day. The other half got my other test local yeast that has proven itself in a few batches already and I’d like to see the differences between these two. As part of my ongoing investigation into the theory that the dominant yeast around my neighborhood is an expressive fruity bubblegum belgiany yeast. The OG for the beer was 12.4°Brix (1.050) according to my refractometer and 1.046 according to my hydrometer so I’m not sure what to believe.
3 oz Glacier hops (5.6% AA) in mash for 80 minutes (+ mashout)
.75 oz East Kent Golding hops (5.9% AA) in mash for 80 minutes (+ mashout)
.75 oz Fuggles hops (6.3% AA) in mash for 80 minutes (+ mashout)
8 oz Leyland Cypress boughs in mash for 80 minutes (+ mashout)
7 oz Lemon Balm plants in mash for 80 minutes (+ mashout)
1 oz Glacier hops in first wort/whirlpool?
.5 oz Saaz hops in first wort/whirlpool?
4 oz Leyland Cypress boughs in first wort/whirlpool?
7 oz Lemon Balm plants in first wort/whirlpool?
For this beer I just dumped all of the herbal and hop mash additions into the mash cooler before I added the hot water that had to cool down it also took about 12 minutes to cool to strike temp and then I mashed for 60 minutes at 154F then I added 4 gallons at 207F to step up to 170F for 20 minutes. Beersmith says I should get around 8.5 IBUs from these mash hops. Then I did a vorlauf and drained into my kettle that had the first wort/whirlpool (i’m really not sure what to call that addition? first wortpool?) herbs. Then I sparged with 3.5 gallons of water at 170F to get a rinse of the remaining sugars. First running gravity 15° Brix (1.061), second running gravity was 9° Brix (1.036). Then a chilled, split between two fermentors and pitched yeast, one a combination of my two wild strains that contain brett and the other my first local yeast from the area. OG 13.2° brix (1.053).
Hops, cypress and lemon balm chilling in the first wortpool
My thought with the first wort/whirlpool additions is to get some more flavor and aroma from those hops and herbs. I’m not certain I’d really get much in the way of IBUs out of hops in this addition, but possibly? The reality of hops is that it’s not IBUs that give their preservative effects, if it was then stuffing casks of IPAs and other beers with dry hops for the voyage to India would have been pointless for the British. I also know a guy who added hops to a batch of pickles and they didn’t ferment, so IBUs don’t matter for preservation, just bittering, though other hop flavor compounds can give a perception of bitterness as well.

 Appearance: Fairly clear light straw color with minimal head that dissipates quickly into a thin surface lacing. Vastly different from the other raw beers.

 Kveikstokk? What’s that?
 After two days there was still no action on the kveikstokker beer and I was wondering if it was going to work. My worries proved unfounded as on the third day krausen formed and it looked to be fermenting just fine. Hooray! It worked! After three or so weeks it appeared to be done fermenting, as did the larger batches with normal pitches of yeast. I bottled the beer and hung the kveikstokk up to dry again. After the beer had been bottled for a bit more than two weeks I chilled a bottle down and poured myself a glass. It was decent, but not as good as the large batch of beer that I used a normal pitch of the abbey yeast on. I’ll do some honest to goodness tasting notes on both of the beers in a few days.
 Appearance: The beer is a pale amber and slightly hazy with a large pillowy head of foam that dissipates very slowly and never fully goes away. Quite a bit of lacing here as well.
 Appearance: The beer pours a hazy light amber with a ton of foamy white head. As the foam collapses it forms a dense foamy cap that does not dissipate, or at least it hung around until I finally drank it down with the final gulp. Lacing is abundant.