60 Second IPA

Certainly if you’re reading this blog you’ve probably heard of Dogfish Head’s 60 Minute IPA where they just constantly dump hops into a beer during the entirety of the 60 minute boil. It’s a fun concept and the beer is pretty good too. If you’re familiar with Dogfish Head you know they like to make a lot of weird beers. It’s a little bit frustrating as a crazy homebrewer when you come up with some brilliant and insane idea for a beer only to find out that Dogfish Head already did that.

So as an homage and also to one up those creative jerks I decided to make a 60 Second IPA. Instead of adding hops continually over the course of a 60 minute boil, I’ll add hops over the course of the last 60 seconds of the boil in an amount high enough to achieve the 40 IBUs required for the style. I actually came up with this idea way back in 2012, when I first heard about a new German variety of hop named Polaris. This hop boasts ~20% alpha acids (which is insanely high if you don’t know about these things). With that high of AA, you can achieve the necessary 40 IBUs in 60 seconds with less than a pound of hops in 5 gallons of beer.

A little while back I got my hands on a pound of Polaris hops (for free no less) so I figured I had to make good on this stupid idea. The recipe for 5 gallons is fairly simple:

  • 7lbs pale ale malt
  • 3lbs pilsner malt
  • 1lb carapils
  • 6oz Mecca Grade Opal 22 (you could sub with victory or biscuit malt)
  • 1lb Polaris hop pellets @ 1 minute 20.8% AA
  • Lallemand BRY-97

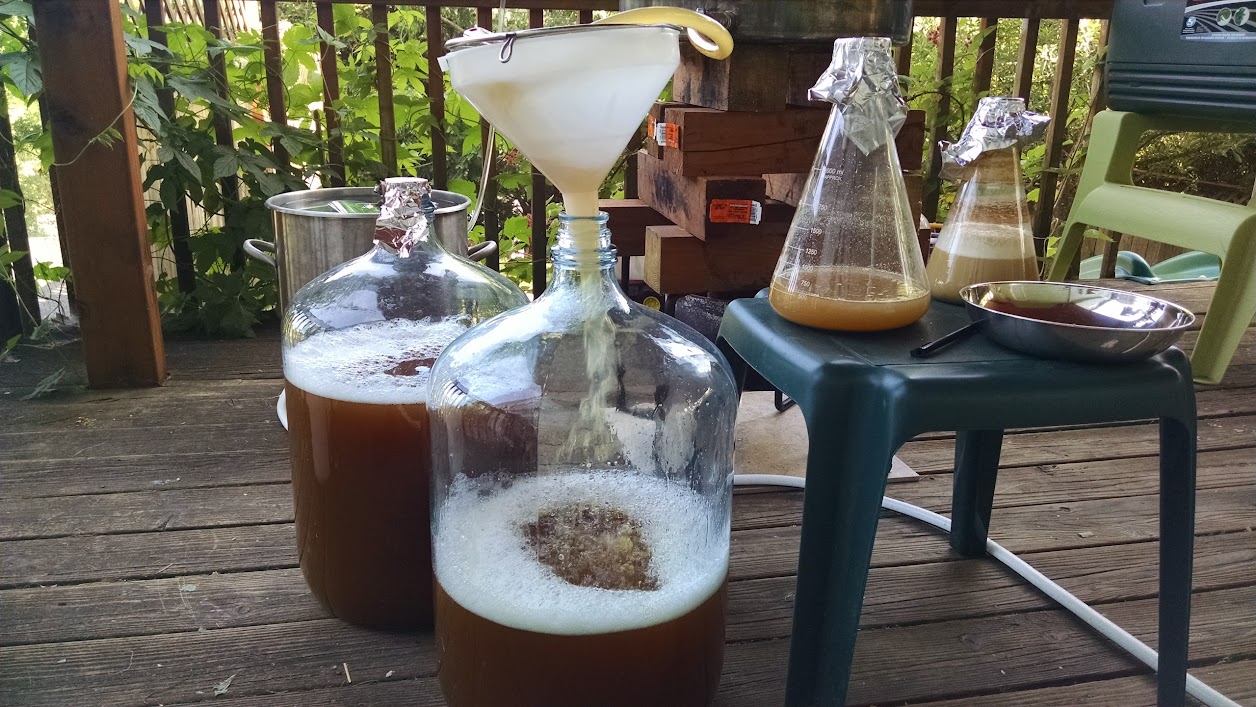
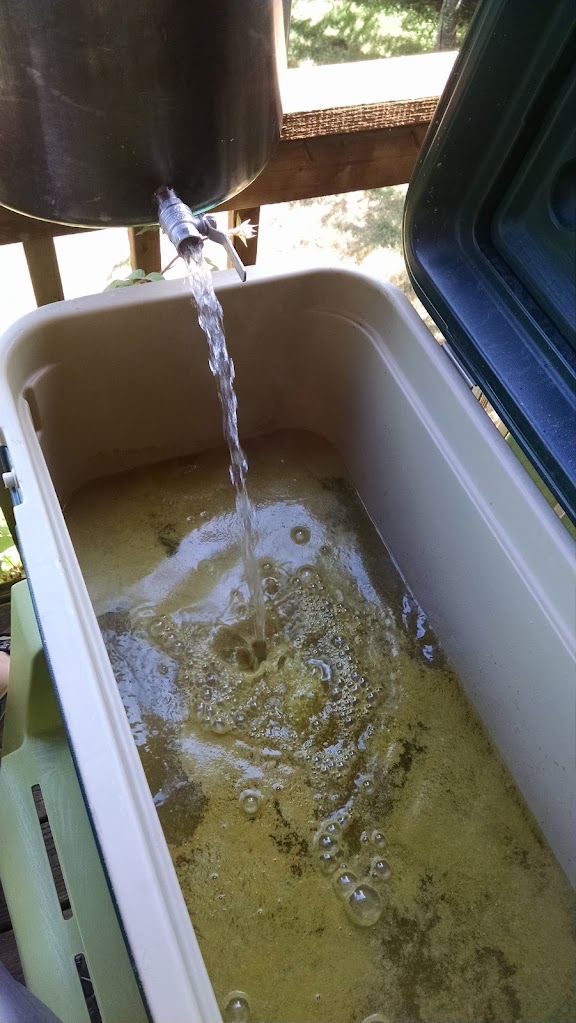
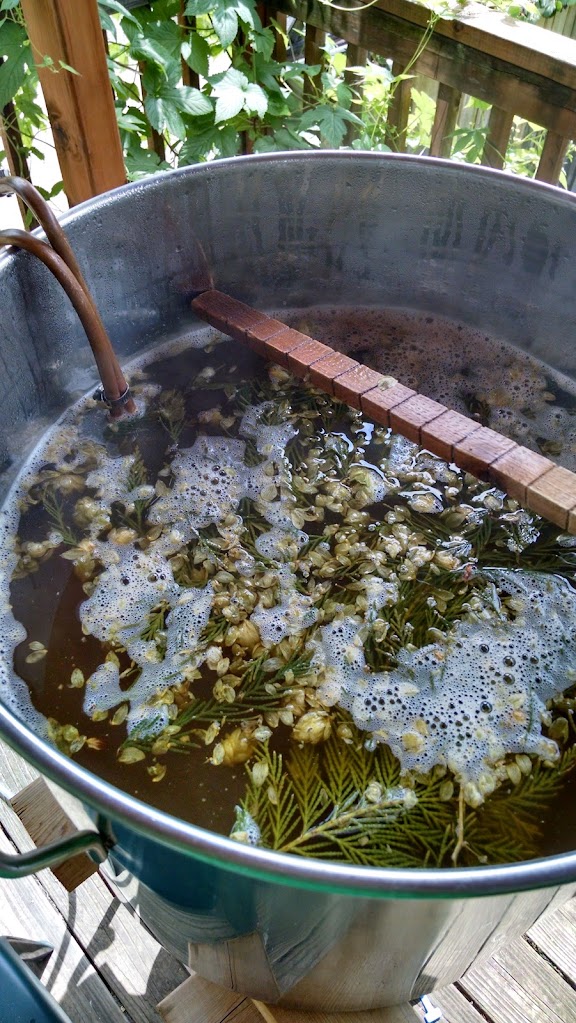
Mash at ~150F, drain, batch sparge etc. I think I boiled it for around 30 minutes, I wasn’t really counting. The hops were so sticky that they just came out of the package in a big chunk so my visions of kinda dumping pellets over the course of the entire last minute of the boil were killed because I’m lazy. I dropped the whole brick in there and I’m pretty sure that alone killed the boil though I left the flame on for the minute before turning it off and began chilling which took about 5 minutes with my hydra.

The brick of hops turned the wort from a nice golden color into what looked like pea soup. I used a manual whirlpool and a strainer to try to keep hop matter out of the fermentor, but it was still completely green when I pitched the yeast

Appearance: The beer pours a slightly hazy gold with plenty of pillowy head and tenacious lacing.

Aroma: The aroma is very fruity, reminiscent of pineapple and other tropical fruit, a hint of citrus is hiding in here as well.

Taste: Pretty intense fruity, juicy flavor; smooth bitterness, there’s a coolness to it that’s not just from the beer temperature, maybe this is what they mean by menthol from the hop, though I would definitely not say it tastes minty at all.

Mouthfeel: There’s a tingling on the tongue that I can’t quite place, probably a combination of the sting of carbonation along with the afore mentioned coolness.

Overall Impression: First of all, I’m blown away that this beer not only turned out drinkable, but actually pretty delicious. The hop flavor is really intense, the bitterness is restrained, and this beer could easily fit in amongst the hazies and NEIPAs that abound these days. Which makes me also wonder what I or others would have thought of this beer seven years ago…

If I were to make this beer again (which I might), I would probably use 13oz at the one minute mark, and reserve the other 3oz to use as a dry hop, if anything it’s a little lacking in aroma. Not that the aroma is low, but for the amount of flavor that smacks you in the face I feel like the aroma is a bit low.

After all this, I’m thinking that Polaris is an underappreciated hop that definitely has a place among today’s star IPA hops. I think it could easily hold its own against Citra, Mosaic, Galaxy, Ekuanot, Azacca etc. I think people see the menthol descriptor and run for the hills, but the other two primary descriptors are pineapple and ice wine. This hop is definitely worthy of more exploration.

Wasp Yeast

I realize I should have posted sooner about the wasp yeast. Here’s a picture:

WTF? yeah, I went and did that. It wasn’t completely my fault though. Maybe partially my fault. Okay, story time:

Ever since I captured some wild yeast from unpasteurized honey, I’ve had this thought in the back of my brain to somehow catch a bee and just throw the bee into a starter and see what I get. Well years have gone by and I haven’t done that. Then, one day a few months ago, I read an article that was posted on Milk the Funk about how some scientists determined that wild saccharomyces yeast will overwinter in the stomachs of queen wasps and hybridize in her gut. That’s kinda neat, kinda creepy too I guess.

A few hours after reading this information I was out putting some chicken into my smoker for the first time since last fall. I take the cover off, and what do I see curled up in the recess of the smoker door handle? It’s a wasp. I poked it with my finger to see if it was dead, it moved a bit, not dead, but pretty sleepy probably since it’s still somewhat cold. It’s an overwintering queen. I put her into a jar.

Coincidentally, I just happened to have to make some starters that same day for a brew day coming up. I took it as a sign from God; the wasp went into a starter. Of course by the time I was ready to put her into the starter, I had brought the jar into the house and she had warmed up and woken up and probably wasn’t too pleased about her imprisonment. Okay, so how do you get an angry wasp in a jar into an erlenmeyer flask full of wort? I thought I could put her in the freezer, but that’d take a while. In the end I just shook the heck out of the jar until she seemed to be pretty stunned then I used the flamed end of an xacto blade handle to crush her a bit and into the starter she went.

She was pretty slow to ferment initially, this picture is actually from before the starter krausened, so something else was going on in there. lacto? enteric? when I tasted the starter (before pitching it into my Farm Hand’s Ale) I didn’t detect any off flavors, mostly it was pretty bitter from hopping the starter, and had the characteristic fruity bubblegum flavors that other local captures of yeast around my neighborhood have. We’ll see how it goes. I made a lot of that beer so I can afford to let her portion age for a while to see what (if anything) shows up.

Brewing raw ale


Filling fermentors with unboiled wort

This past weekend I was able to try a brewing technique that I’ve been wanting to do for a few months now: Brew a no-boil beer, AKA Raw Ale. most brewers have been taught that you have to boil beer, that’s just the way it is and it’s not something to be questioned. Kind of like how beer always has to have hops and barley. None of these is necessarily true, and most of these requirements stem from laws governing commercial production of beer some of them dating back hundreds of years. The truth is, before the advent of large metal pots for boiling in and cheap abundant fuel sources, it was more likely that most beer was not boiled, just heated enough to hasten the conversion of starches to sugars. I’ll admit right off that the historical aspect of this is appealing to me, but more appealing is the amount of time and fuel I can save by brewing this way; practicality FTW.

But wait, you say, isn’t boiling necessary for various practical purposes, like sanitization and hop isomerization? The answer is not exactly. The three main reasons to boil your beer generally taught is to pasteurize your wort to prevent unwanted infection, to boil off DMS which will otherwise make your beer taste like canned corn, and to isomerize and dissolve alpha acids from hops into the wort to lend bitterness to your beer. There are some other things that also happen in the boil but these three are often touted as the main reasons why you have to boil your wort. Let’s talk about them.

  1. Boiling pasteurizes your wort. Actually pasteurization can happen at much cooler temps than boiling. It will happen in 30 minutes at 150F and in like 3 seconds at 160F. So your standard hour long mash should be effective pasteurization for your wort.
  2. Boiling drives off DMS. This is true, the thing we’re missing is that DMS doesn’t form until the wort reaches 175-180F so if you don’t go above this you don’t get DMS.
  3. Boiling isomerizes and dissolves alpha acids from hops. This is true and is the biggest drawback to brewing raw ale. However you can get some isomerization and IBUs by putting hops in your mash. By using high alpha varieties (I like Horizon) and in large quantities you can achieve an IBU level that is fine for a number of styles; styles I happen to enjoy. You’d probably have trouble getting to IBU levels required for a double IPA with this method, but for belgian/farmhouse styles 10-15 IBU is ok. I’ve also thought about adding hops in your strike and sparge water, I’ve read that you need some sugar in solution to get isomerization but have never actually seen any science backing this assertion up.

So having rationalized away most of these requirements, I felt confident to give raw ale a try. Due to it being Father’s Day weekend and me having an awesome wife, I was able to brew on Saturday and Sunday. This did indeed shave a couple hours off of my brew day so I was happy about that (and so was Anne). I brewed a spruce beer on Saturday and a lemon balm and cypress beer on sunday. I used slightly different techniques for each to see sort of what that would do for the beers.

Spruce beer


hopped strike water in the mash

For this beer I used the following recipe:

  • 14 lbs Northwest pale malt
  • 6 lbs Munich 20L
  • 4 lbs Flaked wheat
  • 4 oz Horizon hops (11.5% AA) in the mash for 70 minutes (60 minutes saccharification + 10 minutes mashout)
  • 4 oz Spruce tips in the mash for 70 minutes (60 minutes saccharification + 10 minutes mashout)
  • 4 oz Spruce tips in the mash for 40 minutes (30 minutes saccharification + 10 minutes mashout)
  • 4 oz Spruce tips in the mash for 20 minutes (10 minutes saccharification + 10 minutes mashout)

I mash in a cooler and I add water that’s well above my strike temp to the room temp cooler, then let the water cool to my strike temp before doughing in. Right before I added the water I though, i should add some hops now, so I dumped in about half of the 4 oz right before I added the 180F water to the mash cooler. It took about 12 minutes to cool to my strike temp of 166F when I added the grain the rest of the hops and the first charge of spruce tips. After 30 minutes I added the second charge and sorta kinda stirred them into the mash and the same again 20 minutes later. After the full 60 minute mash the temp was down to about 150F which is more than I typically lose. I’m going to blame opening the mash up twice and adding cold/frozen spruce tips to it; still an acceptable loss. I vorlaufed about 3 gallons until it was running quite clear and drained the mash. My first running gravity was 19° Brix (1.077) according to my refractometer. I added 7.5 gallons of sparge water at 180F and achieved a mashout temp of 168F that I let sit for 10 minutes and then vorlaufed and drained again. Second running gravity was 8.4° Brix (1.034).

After draining the sparge, I began chilling the wort for pitching yeast, hey, it’s a no boil! Chilling didn’t seem to be much shorter than when I boil which does make sense. Once I got it down to 80F I drained into two carboys and pitched yeast. For this beer I’m trying out a new local yeast I harvested in some final runnings from my last brew day in the spring that I left sitting open to the air while I cleaned and put everything away then I added a plum blossom from my tree and it was fermenting by the next day. The other half got my other test local yeast that has proven itself in a few batches already and I’d like to see the differences between these two. As part of my ongoing investigation into the theory that the dominant yeast around my neighborhood is an expressive fruity bubblegum belgiany yeast. The OG for the beer was 12.4°Brix (1.050) according to my refractometer and 1.046 according to my hydrometer so I’m not sure what to believe.

Update: Tasting notes for the spruce beer

Lemon balm and cypress beer


Lemon balm, cypress and hops in the mash cooler

On Sunday I brewed this recipe:

  • 11 lbs Northwest pale malt
  • 9.25 lbs Pilsner malt
  • 3.75 lbs Munich 20L
  • 3 oz Glacier hops (5.6% AA) in mash for 80 minutes (+ mashout)
  • .75 oz East Kent Golding hops (5.9% AA) in mash for 80 minutes (+ mashout)
  • .75 oz Fuggles hops (6.3% AA) in mash for 80 minutes (+ mashout)
  • 8 oz Leyland Cypress boughs in mash for 80 minutes (+ mashout)
  • 7 oz Lemon Balm plants in mash for 80 minutes (+ mashout)
  • 1 oz Glacier hops in first wort/whirlpool?
  • .5 oz Saaz hops in first wort/whirlpool?
  • 4 oz Leyland Cypress boughs in first wort/whirlpool?
  • 7 oz Lemon Balm plants in first wort/whirlpool?

For this beer I just dumped all of the herbal and hop mash additions into the mash cooler before I added the hot water that had to cool down it also took about 12 minutes to cool to strike temp and then I mashed for 60 minutes at 154F then I added 4 gallons at 207F to step up to 170F for 20 minutes. Beersmith says I should get around 8.5 IBUs from these mash hops. Then I did a vorlauf and drained into my kettle that had the first wort/whirlpool (i’m really not sure what to call that addition? first wortpool?) herbs. Then I sparged with 3.5 gallons of water at 170F to get a rinse of the remaining sugars. First running gravity 15° Brix (1.061), second running gravity was 9° Brix (1.036). Then a chilled, split between two fermentors and pitched yeast, one a combination of my two wild strains that contain brett and the other my first local yeast from the area. OG 13.2° brix (1.053).


Hops, cypress and lemon balm chilling in the first wortpool

My thought with the first wort/whirlpool additions is to get some more flavor and aroma from those hops and herbs. I’m not certain I’d really get much in the way of IBUs out of hops in this addition, but possibly? The reality of hops is that it’s not IBUs that give their preservative effects, if it was then stuffing casks of IPAs and other beers with dry hops for the voyage to India would have been pointless for the British. I also know a guy who added hops to a batch of pickles and they didn’t ferment, so IBUs don’t matter for preservation, just bittering, though other hop flavor compounds can give a perception of bitterness as well.

Update: I’ve added some misc notes and observations in a new post. Tasting notes to come soon.

Update: Tasting notes for the lemon balm and cypress beer

How to harvest wild yeast

A number of people have inquired about my process of capturing wild yeast for use in my beers so I figured I should write up a detailed post about my process, which is actually fairly low tech and easy for anyone to do. I don’t capture yeast from the air, I’ve never tried so dont ask me anything about how to do that. I’ve captured almost all of my yeast from fruit and that’s what I’m going to show you how to do here.

Step 1: Find some fruit.

Almost all sugary fruit has got yeast hanging out on it waiting to get access to that sugar to have a feast. I recommend using fruit you grew yourself or wild foraged that way you know for certain that it hasn’t been treated with any chemicals or irradiated to kill those wonderful yeasties that you’re after. That said, I’ve captured yeast from dates imported from Oman and Mexico, and even from some cherries I got at walmart so if you don’t have access to a fruit filled garden don’t let that stop you. If you are going to get fruit from the store, I recommend organic, though it’s not required.

Step 2: Make a (hopped) starter.

Make yourself a low gravity starter (1.020-1.030), 300mL is plenty if you get something good you can step it up later. Add a touch of yeast nutrient to the starter. If you want to decrease your chances of getting lactobacillus and pediococcus (and other bacteria) drop a hop pellet or two into your starter when you’re boiling it. You don’t need to do a long boil for the hops, they are anti-bacterial even when not isomerized. Don’t bother trying to decant off the hop gunk or filter them out, it doesn’t matter and you’ll just contaminate your wort which is reserved for the next step.

Juniper berries and branches in a starter

Step 3: Add the fruit to the starter.

Take the fruit you’ve selected and add it to your starter. You have now pitched the yeast into your starter. Swirl it up really well to add some oxygen and then put an airlock on the starter. I know this is against the logic of starters where you want lots of oxygen for yeast to be able to reproduce, but with a wild inoculation there are other things that need a good supply of oxygen that you don’t want to grow, like acetic acid bacteria and mold. Put the airlock on, you can use foil when you’re stepping up something good later on. It may take a week or even longer before you see activity, don’t despair. While there is yeast on fruit, there’s generally not a whole lot of it so be patient.

Step 4: Determine if you got something worth pursuing.

Once you start seeing activity, you should get some sort of a krausen on your starter. Now it’s time to determine if you got something good. Take the airlock off and give it a good sniff. If it doesn’t smell like vomit you’re probably good to go. If it smells good leave it alone to let it finish fermenting and flocculate out. Once the foam has died down and the yeast has settled stick it in the fridge to crash. Make a step up starter at this point if you think you’ve got something good. Once it’s crashed use a thief/baster to decant the ‘beer’ off the top of the yeast layer. I stick a racking cane cap on the tip of my baster so I don’t have to worry as much about sucking up yeast from the bottom.

Smell the beer and if it doesn’t smell off, give it a taste to see what you’ve got. Look for esters and phenols, as well as off flavors. If you do have some butyric acid (pukey or parmesan flavors) in small quantities don’t worry, you may have had some enteric bacteria initially but they have a very low alcohol tolerance so they should have died off after the yeast got going. If you step this up that flavor will likely be gone. Additionally brettanomyces can eat the butyric acid and make wonderful pear flavors out of it. If your beer is sour you probably got lacto as well as yeast, if this is what you wanted, great! if not, you can dump it and start over or try washing the yeast which I’ll have to write a different post about.

If it smells and tastes good, step it up with a bigger starter to build up a pitchable population for a batch of beer. Congrats you’ve got some wild yeast to make delicious beer with!

Yeast from an Omani Date

Some additional notes:

If you want to increase your chances of getting something good that’s not contaminated with something awful you could add the same fruit to a few starters, I’ve never actually done this though. My success rate has been better than 50% for getting something good that makes good beer vs getting things that were just weird/off or moldy that I dumped.

Some fruits are likely more prone to have nasty on them: Strawberries seem to rot if you look at them wrong, I’ve never used one to harvest yeast but I feel like that would be a waste of time and effort. Apples are often used to start sourdough cultures so if your looking for sour bugs that’s a good place to start, otherwise I’d avoid it. Obviously don’t use overripe or rotting fruit. I’ve had good luck getting just yeast cultures off of grapes and dates in particular, raw honey is another good one to try.

If you were going for just yeast, you probably got a mix of saccharomyces and brettanomyces in your starter, keep this in mind particularly if you are bottling the beer, the brett can keep on working on higher chain sugars for a long time and you may end up with overcarbed beer or even exploding bottles, this can be minimized if you store the bottles in the fridge after conditioning. Personally I like to save off a gallon of my first beer with a new wild yeast and just let it sit for 6+ months to see if it does anything interesting. I have one strain that starts out fruity like english strains and after a few months those give way to spicy saison-like phenols. This is likely the action of both sacc and brett, but I don’t have a microscope so I don’t know for sure.

I generally harvest the dregs from my first batch in a jar that I keep in the fridge. Then when I want to make an new batch with that yeast, I take a small amount from the jar and step that up in a starter. You can however keep harvesting the dregs and reusing them each time, this will eventually select for yeast that is more flocculant and yeast that gets going quicker, in other words any brett and other yeast that takes its time will be weeded out.

Is this beer infected? Yes it is.

A lot of threads over on the Homebrewing Subreddit ask if their beer is infected, and 99% of the time it’s not. Well this beer is infected! I infected it myself. Here’s the story:

A while back I harvested two different wild yeasts, one from some juniper berries I picked at the Palatki indian ruins in Sedona, AZ and the other from a date purchased at the local super market, though the date originated in Mexico. Both of these sources provided me with yeast and bacteria when I initially added them to starters. I washed these starters using chlorine dioxide (which I should really write a post about). I’d never washed yeast before and I wasn’t entirely confident that I wouldn’t kill the yeast along with the bacteria, so I saved a bit of each starter aside before I washed. The washing process did work however and I got my yeast sans-bacteria, these two strains became my Palatki Strain and my Fruity Strain respectively.

Since I am lazy I just kinda left the two vials I saved some of each initial strain out (covered of course) in my office for a few months, one of them grew a strange goopy yeast colored sort of pellicle, they both got rather sour (yes I did taste them). I have been wanting to brew up some sort of lambic-like beer and I thought to myself, I will just blend these two infected starter batches together and step that up and put it into a beer. So that is what I did. I won’t know how the beer turns out for a long while yet, but I pulled the beer out of my fermenting fridge today after being in there for 3-4 weeks in preparation to rack it into a new carboy for an extended secondary. and it had the funky pellicle on top. It is definitely infected:

So there you go, if you were wondering what an infected beer looks like. This one is infected and that’s what it looks like. Other infections can look different, but this is how mine looks.

I gave it a whiff after moving it and it has a sour but very fruity aroma, I’m looking forward to this beer, I think it’ll be excellent and I’ll have my very own bug farm for future sours.

Rhubarb Menace

There is a concotion that has been growing in popularity in some homebrew circles, and I’ve even seen something like it being produced by some commercial breweries. It’s called Graff, and it’s a hybrid of beer and cider, though arguably more cider than beer, though I suppose that depends on how you decided to build a recipe. I don’t have access to a lot of apples, however I do have access to a lot of rhubarb. now rhubarb and apples aren’t particularly similar, except they both have malic acid as their predominant acid. I figured this was good enough reason to try making a graff with rhubarb instead of apples.

Thus was born Rhubarb Menace.

Some of the other differences in rhubarb and apples is the amount of sugar. Apple juice will have around 5% sugar, rhubarb has pretty much no sugar to speak of. Rhubarb also has a much stronger concentration of acid compared to apples so I don’t need as much rhubarb to achieve a similar amount of acid/flavor compared to apples. To make up for these differences I added table sugar (sucrose) and water to my recipe to sort of simulate apple juice but made from rhubarb.

As for the grain bill, ‘traditional’ graff has got some wheat to aid in head retention, a bit of crystal malt, and a bunch of light dry malt extract or just pale malt. I kind of wanted to have a red color in my graff so I decided to go with some Carared crystal malt, I also wanted some caramelly flavors so I added a crystal 120, and also a pound of two-row and a pound of wheat.

My recipe ended up as the following:

* 10 Lbs Rhubarb * 3 Lbs Carared * 2 Lbs table sugar * 1 Lb Crystal 120 * 1 Lb malted two-row barley * 1 Lb malted wheat * 8 oz Ginger Syrup (@10 minutes) * 1 oz Cascade Hops (@15 minutes) * 1 Tbsp Calcium Carbonate * 1 Tbsp Pectic Enzyme * 1 tsp Yeast Nutrient * Wyeast Belgian Ardennes yeast

I put the rhubarb in the fermentor with the sugar, calcium carbonate, and pectinase to thaw in the morning.

In the evening I did a fairly large minimash with all the grain in ~2 gallons of water. That went pretty well but it was a bit large for the small pot I was using. Regardless I seemed to get pretty good efficiency.

After the boil I strained out the hops and poured the hot wort over the top of the still partially frozen rhubarb, this worked pretty well to cool the wort down. Then I filled the fermentor with additional water to about the 5.25 gallon line. The temperature was around 72F so I pitched the yeast and sealed the fermentor. OG 1.048

Fermentation took off and it went pretty well. I pressed the rhubarb after a week and left the beer in the primary, it had fermented fairly quickly and a lot further down than I (or hopville) had anticipated; it was at around 1.008 at pressing. It looks like the Ardennes yeast ate pretty much all of the sugar except for the stuff from the Crystal 120. I’d adjust the recipe for future batches to include additional crystal malt (I know carared is crystal but apparently it’s not crystal enough).

Tasting it at pressing I was unimpressed, it didn’t taste bad or anything but it also didn’t taste good, it was a really sort of meh. I knew from some of the talk about graff that age is very important to the beer’s flavor so I held out some small hope.

I left it in primary for another week, then I transferred it to a keg. FG was 1.006 for an ABV of 5.6% it was tasting slightly better after the week but I was still unimpressed.

After 2 weeks in the keg the flavor had improved drastically, the flavors really came out and can be picked out when you taste it as opposed to before when it was just a muddy mess. It is a sour beer (how could it not be?) with a slight fruitiness and some malt in the background, it tastes a lot like a sour red ale, if you like sour beers you will probably like this. I’m quite pleased with how this has come out especially after being fairly concerned with the initial tastes at pressing/transfer.

As I mentioned above, I would adjust the recipe to include a bit more dark crystal malt to leave some additional residual sweetness and boost the malt flavor a bit more, and maybe use a munich malt instead of two-row. I can’t taste the ginger at all so I’d just leave that out and probably increase the hops. Obviously this could use a bit of refining but I’d call this first try a success.

Ahab’s Ruin

With the success of my Dark Cherry Whatever I decided I would brew another beer and ferment it using the leftover pressed fruit from a wine. This time I used the crushed and dessicated grapes from my small grape harvest this year. I had enough grapes this year to make about a gallon of wine, I pressed the grapes and then added the pomace into a batch of Merlot that I made from canned concentrate, then I pressed them again and put them in the freezer until I was ready to make this beer.

After doing some research I found out that Dogfish Head had made a wine-beer hybrid call Red-White which was a Wit style ale with Zinfandel grape juice added. Since I like Wit beers and my grapes were red (they’re Marquette). The name for this beer came from a friend of mine suggesting I call these wine-ale hybrid beers ‘Wale’ so Wit Wale became Ahab’s Ruin which is probably a bit dramatic.

Here you can see the pot starting to heat up and some of my ingredients, including the grape skins and slurry in the plastic bag on the right.

I put together a fairly simple recipe for the beer, basically half wheat extract and half table sugar (to simulate the grape sugar if unfermented grapes had been added) a bit of Crystal 40 for some color and more complex sugars. Instead of the traditional hops, because let’s face it, this beer is already off the map in terms of tradition, I used Cascade hops from my yard (they’re free and I have loads of them) and, of course, coriander and orange peel. Half of the coriander came from my garden, but apparently an ounce of coriander is a lot of coriander seeds and I had to supplement with some store bought seeds.

Once the beer had been brewed and cooled I put in in the fermentor and added in the grape skins, seeds, yeast slurry and whatever other residue was left over from the wine fermentation that I had saved. I poured it into a mesh bag in the fermentor, which I highly recommend doing if you’re going to be doing this sort of thing. The beer/wale fermented fairly well though it took the yeast a little while to get started, I think this is probably because the yeast had been frozen, and maybe because the montrachet yeasts were like, “Hops? What the heck is hops?” But they got the job done in the end, fermenting down to 1.005, I was worried that it might end up being too dry.

Once the beer was done fermenting I kegged it since I recently got some a kegging system set up (which I can’t reccommend enough over bottling). It did not turn out too dry, there’s just enough malt sweetness to balance the spice of the coriander and the fruity sourness from the orange peel and grapes. I’m pretty pleased with how this came out and I’ll be making this again with next year’s grapes.

Dark Cherry Whatever

I dubbed this beer a “whatever” since It’s not really any particular style, maybe Belgian Dark would be the closest, but it doesn’t use a Belgian yeast. I’m not even sure it’s an ale since it fermented with wine yeast (though it did ferment at ale temperatures).

Here’s the story of this beer: There are a couple of cherry trees in the St. Francis Seminary and last summer (summer of 2010) the trees had a bumper crop of cherries on them. This doesn’t happen every year since they don’t prune the trees; this summer there were barely any. But last summer we filled 4-5 gallon ziplock bags with cherries and took them home and put them in the freezer. I’m not totally certain of the variety of cherry but they are bright red, about the size of a nickel and sour.

This spring I thawed the cherries out and made a cherry wine from them. When the wine had just about fermented out I pressed the cherries and saved them. I then mixed up a mead and added the pressed cherries to the mead. The yeast that was still hanging out on the cherries quite happily fermented the mead and then I pressed the cherries once again. And once again I saved the pressed cherries. Then I made some wort.

I used dark malt extract and some left over specialty grains from my Backyard Anarchy experiment. I used 4 ounces of hops, which makes this beer the hoppiest I’ve ever brewed (~41 IBU). The hops came from my friend Steve’s Cascade plant, which my own cascade plant is a child/clone of. I used a hop schedule of 2oz at 50 minutes, 1oz at 5 minutes and 1oz dry hopped. When the wort had been brewed and cooled I added the 1oz of dry hops to a muslin bag and then also added the pressed cherries to the bag and added it to the fermentor. I wasn’t sure how much cherry flavor would be left in the twice (soon to be thrice) fermented cherries but I figured it was worth a shot, even if no cherry flavor came through it’d still be a decent dark beer. After two weeks in the fermentor I took the cherries (and hops) out and pressed the bag (because why not?) in my fruit press, but I was a lot more gentle this time than I was with my other pressings of the cherries. Then I added priming sugar and bottled the beer.

I’m really pleased with how this beer turned out. It is dark, malty, hoppy, and cherry all at the same time. It is surprisingly well balanced considering I was working with some unknowns (how much cherry flavor would be imparted by the cherries, what sorts of flavors would the Montrachet yeast contribute especially after the ‘third’ generation, etc). I’m going to be very sad when this beer is gone because I doubt I will be able to replicate it.

Backyard Anarchy

So after my somewhat successful attempt at a gruit I decided to make a real recipe using grains of my own choosing and quantities of herbs from the yard. I decided I wanted to use the Sweet Cicely and Monarda (Bee Balm) that are growing in the yard. We had also been harvesting a lot of Rasberries at the time so I decided to use some raspberry leaves in the brew as well.

I used the green seeds of the sweet cicely plant, well muddled and added them at the beginning of the boil. I added a handful of raspberry leaves and a lot of monarda (both leaves and flowers) at 30 minutes and then some more monarda leaves and flowers at 5 minutes.

The grain bill consisted mostly of Belgian Pils with a little cara-pils for body (which is stupid when you’re using a wild yeast that most likely contains brett) and some Belgian Special B for color and flavor. Here’s the full recipe on Brewtoad.

The brewing went well enough, the herbs smelled pretty good, obviously the Monarda dominated everything. Once the wort was cooled I pitched my wild yeast that had previously fermented the Backyard Suburban Nightmare and set it aside to ferment.

Then it got hot. I’m pretty sure the beer fermented at over 80F the entire time. I believe it was the hot temp combined with the lack of hops that led to the emergence of the lactobacillus. At least I’m pretty confident it was lacto, though it could simply have been the brett yeast, but it added a lot of lactic acid. It also formed this fun pellicle.

I bottled it anyway, it wasn’t terrible, just fairly sour and tasting/smelling of Monarda.

The beer pours a beautiful reddish hue with little head that dissipates quickly. The aroma is very distinct, smelling of Monarda, and some of the sourness is also detectable here. The taste is very sour and herbal with a slight malt background. I don’t think I’ll brew this again, but I’m glad I tried it. I’m not terribly displeased with the results and I’m sure I will slowly be drinking these beers until they’re gone. The lacto wasn’t intended but I really can’t be upset about it especially when the beer is called Anarchy.

Backyard Suburban Nightmare

I mentioned before that I’m going to label beers fermented with my wild yeast under the name Feral. Well as a sort of sub-Feral line I’m going to label beers hopped/spiced/flavored with items from my yard under the name Backyard. These are currently all very experimental beers (obviously).

The first in the series is called Backyard Suburban Nightmare. I decided I’d make a beer using edible weeds, particularly clover and dandelions. This beer has no hops and it is spiced with Dandelion Root, Clover Blossoms, Ginger Root, and Cardamom.

I made this beer by straining hot water through my not quite spent grain from my Saison (remember I had crap efficiency). That gave me around a gallon and a half of not terribly sweet wort which I added a few cups of table sugar to and boiled with some muddled dandelion roots, a few dandelion leaves, a lot of clover blossoms, a tablespoon of ground ginger and a dash of ground cardamom (because it was there).

Cooled and pitched my Feral yeast onto it the next morning. It fermented like a normal beer and I bottled it. It turned out decent, mostly to me it tastes like an alcoholic ginger beer with a slight astringency. Looking back I wish I hadn’t added the ginger since it dominates the flavor and I can’t really taste the other herbs. There’s a slight lemonyish flavor hiding in the background which may be from the clover and/or possibly the lacto bactria hiding among the yeast in my feral blend.